Last updated on: December 26, 2025
Table of Contents
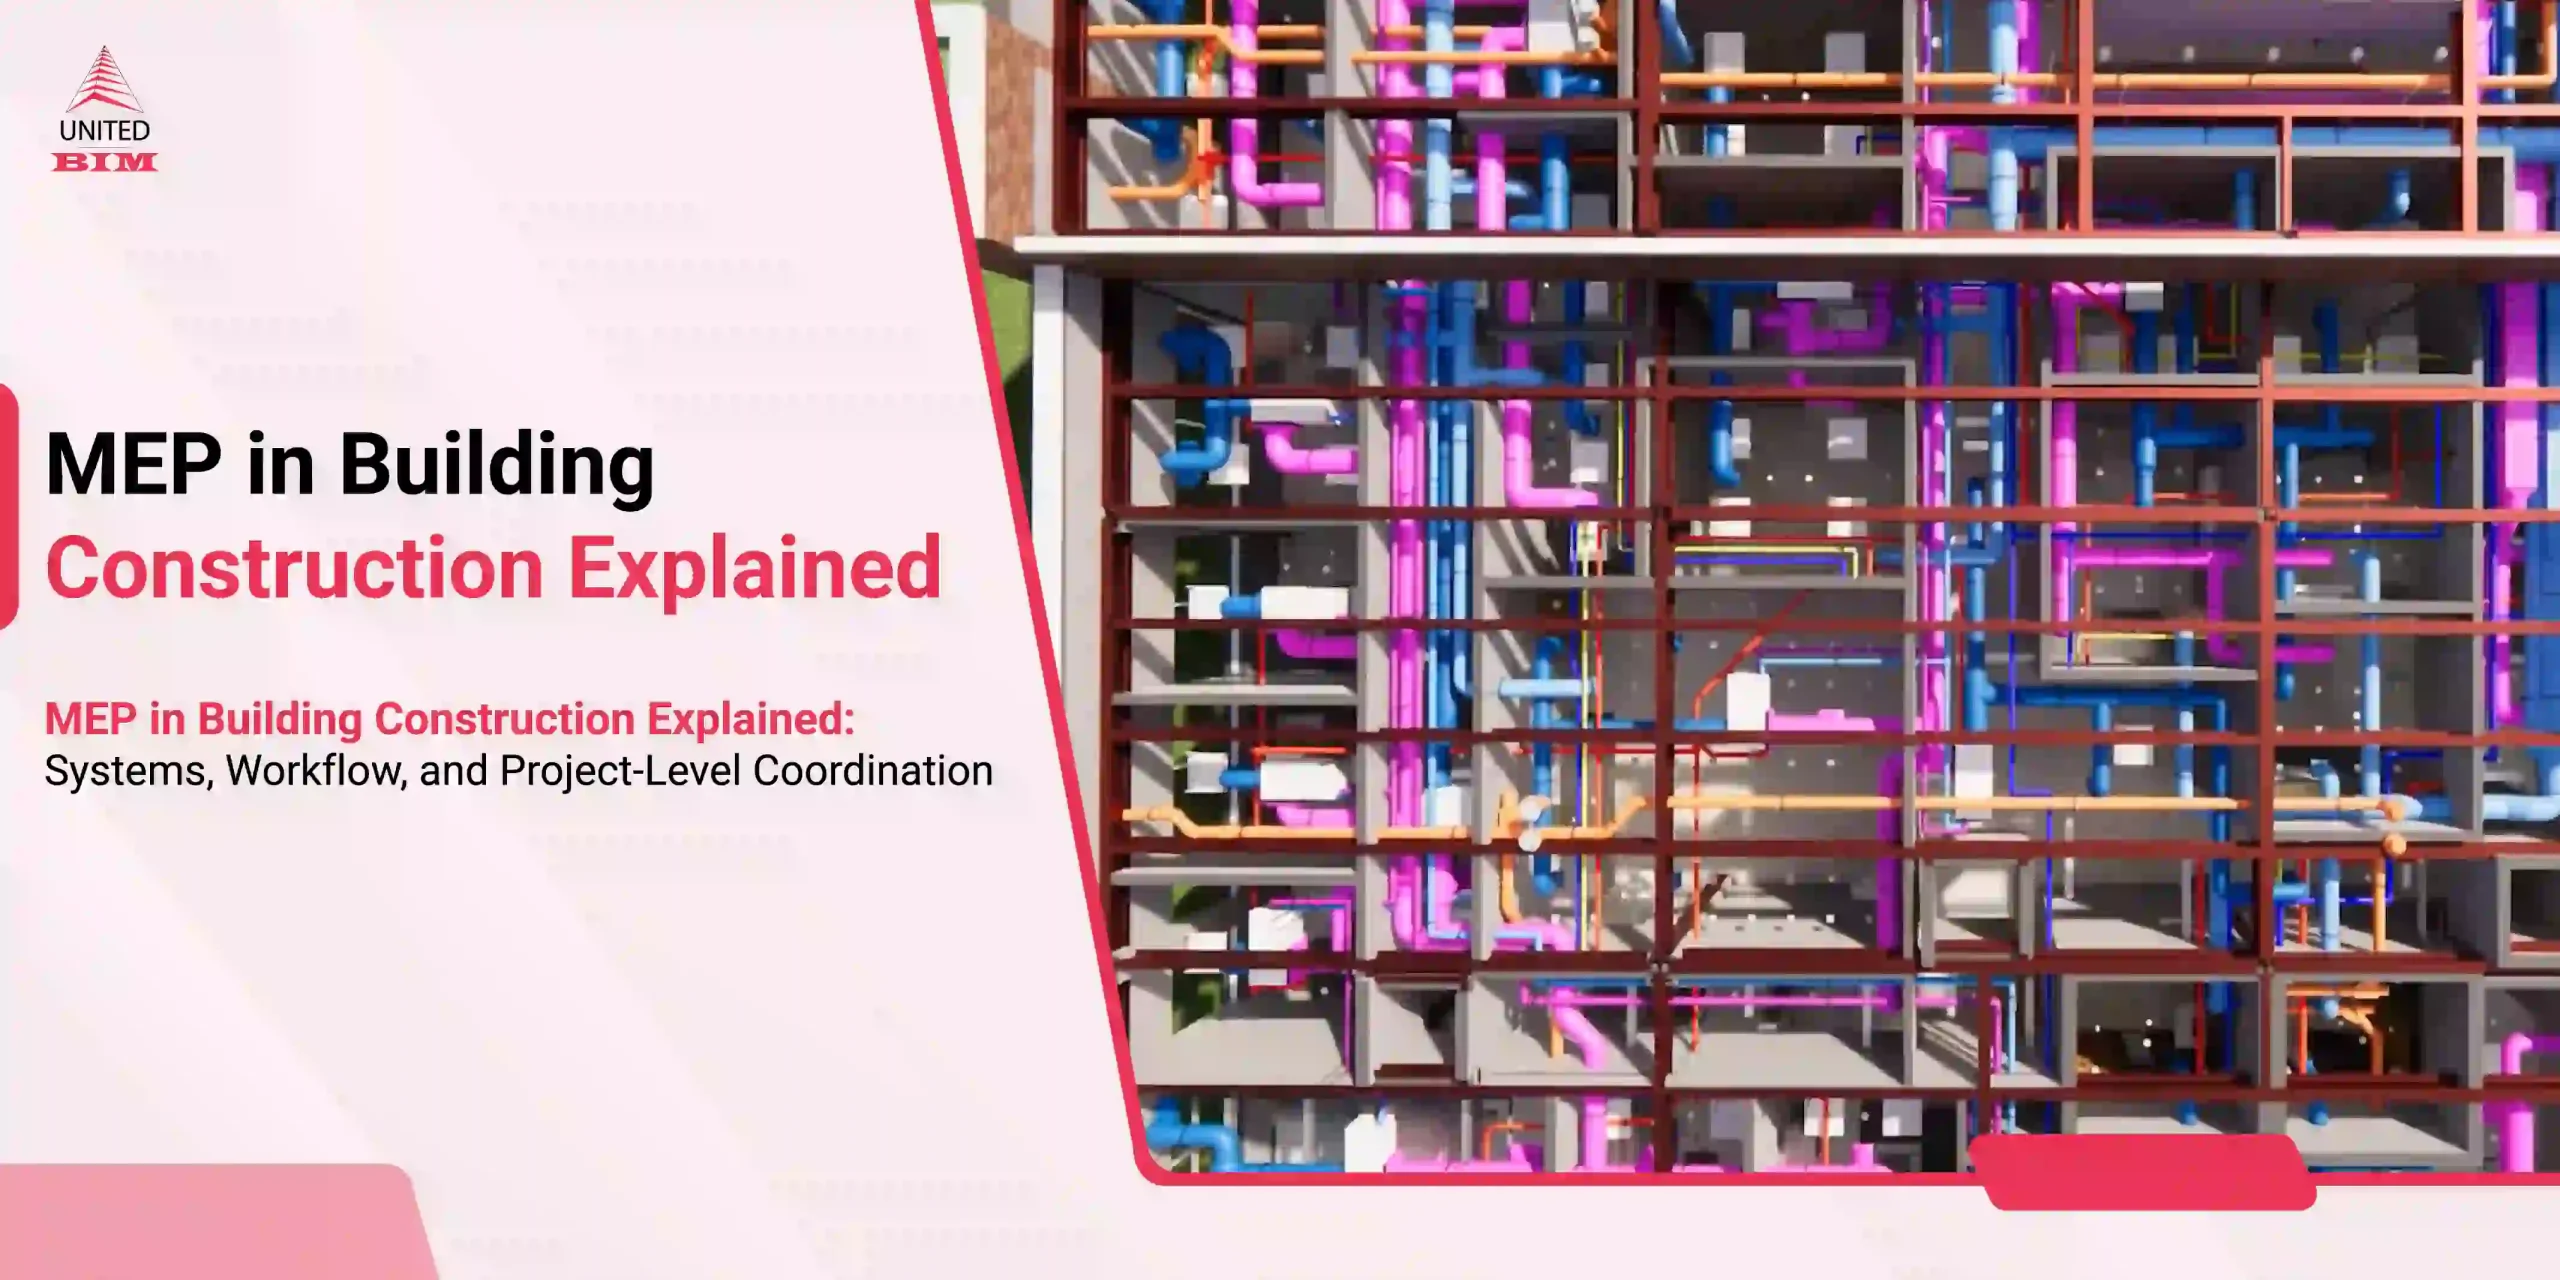
Scan to BIM is an end-to-end workflow used to create accurate as-built BIM models from existing buildings using 3D laser scanning and reality capture technologies. A critical stage within this workflow is Point Cloud to BIM, where processed scan data is converted into an intelligent BIM model, typically developed in Autodesk Revit.
When we talk about the Scan to BIM process, we are referring to a structured series of steps used to capture, process, and model existing building conditions with a high level of accuracy. This process is widely used across renovation, retrofit, and facility documentation projects where reliable as-built information is essential.
According to The B1M, one of the construction industry’s leading knowledge platforms, Scan to BIM is “the process of 3D laser scanning a physical space or site to create an accurate digital representation that can be used for design, assessment, or comparison.”
In practical terms, whenever an existing building needs to undergo renovation, refurbishment, retrofitting, or reconstruction while retaining most of the original structure and systems- having an accurate digital representation becomes critical. This is achieved using laser scanning, where millions of spatial data points are captured and combined to form a point cloud.
This point cloud data is then used in the Point Cloud to BIM modeling stage to develop a reliable as-built BIM model.
If you’d like to explore a focused example, you can also review our detailed Point Cloud to BIM case study for a mechanical room project.
Don’t have the time to read the whole blog, no worries you can download it and read it at your convenient time.
Scan to BIM & Point Cloud to BIM – How They Are Connected
With Point Cloud to BIM being a part of the Scan to BIM workflow, it is important to understand how the complete process is executed, from initial data capture to final quality assurance.
Scan to BIM refers to the entire workflow, while Point Cloud to BIM specifically refers to the modeling stage, where scan data is converted into a usable BIM model. In practice, both terms are closely related and often used together, as the success of a Scan to BIM project depends heavily on accurate Point Cloud to BIM conversion.
Intended Use of the Scan to BIM Process
The Scan to BIM process is commonly used for:
- Site verification and existing condition documentation
- Design validation, planning, and comparison
- Development of as-built drawings
- Clash and interference checks
- Demolition or addition of MEP and construction elements
- Quantity take-offs and budget estimation
- Facility management and long-term asset documentation
Based on project requirements, Scan to BIM documentation can be delivered at different levels, including:
- Level 1: Floor plans
- Level 2: Exterior elevations and roof plans
- Level 3: Sections
- Level 4: Site plan layouts
Executing a Scan to BIM project can be complex. To ensure accuracy and consistency, the workflow is divided into four structured stages:
- Capture
- Process
- Point Cloud to BIM Modeling
- PQuality Assurance.
All stages are executed in accordance with the BIM Execution Plan (BEP/BXP) and defined project workflows.
Case Study Overview – Real-Life Project
In this project, the client required accurate documentation of an existing mechanical room in a school facility in Florida. The objective was to support a renovation project involving complex HVAC piping and fittings, which are difficult to measure manually.
To achieve the required accuracy, a Scan to BIM approach was adopted to digitally represent the facility and develop an as-built BIM model.

Step 1 : Capture – Laser Scanning & Reality Capture
The first stage of the Scan to BIM process involves capturing as much accurate information as possible from the site and the client. At this stage, the Scope of Work (SOW), Level of Detail (LOD), timelines, and accuracy requirements are clearly defined.
For Scan to BIM projects, data capture typically involves two sub-phases:
(i) Pre-Mobilization Considerations
This phase includes scanner selection, site planning, and alignment with USIBD Level of Accuracy (LOA) requirements and the BEP/BXP. Different laser scanners offer different ranges, resolutions, and accuracies, so selecting the right equipment is critical to meeting project objectives.
(ii) On-Site Data Capture
During on-site scanning, the laser scanner is positioned on a tripod and emits eye-safe laser beams that rotate at high speed. When the laser hits a surface, its position is recorded as spatial coordinates- commonly referred to as points.
Millions of these points combine to form a point cloud scan, accurately representing the existing conditions.
Read more about our Scan to BIM Services. We would be more than happy to add value to your project!
Case Study Note:
For this project, a laser scanning device was used to capture the mechanical room from approximately 40 scan positions, generating a point cloud dataset in .RCS format.


Step 2: Process – Point Cloud Processing & Registration
After capture, the scan data is processed and validated. This step ensures the point cloud data is clean, aligned, and suitable for BIM modeling.
Processing typically involves:
- Validating scan data integrity
- Removing noise and irrelevant data
- Breaking large datasets into manageable clusters
- Registering multiple scans into a unified coordinate system
Accurate registration is essential, as any misalignment can affect the reliability of the final BIM model.
Software such as Autodesk ReCap Pro is commonly used to clean, organize, and visualize large point cloud datasets efficiently.
Case Study- A Real Life Project
In the process phase of the project, the intention was to develop a BIM Model from the Point Cloud Scan. The file size of the Point Cloud Scan was around 14.2 GB with 40 different reference points. We devised ReCap Pro software to gain a full view of the Point Cloud Scan with all the intricate details.
There are two types of Point Cloud File Types
- .RCP: Autodesk ReCap Scans (Individual Scan File)
- .RCS: Autodesk ReCap Projects (Project File that references indexed scan files)


Step 3: Point Cloud to BIM Modeling
Modeling is where the Point Cloud, a real-life scan of the project gets shape in a digital platform. To model the Point Cloud Scan, several steps need to be followed from Verification of the Point Cloud Scan, Project Information to File Insertion in Revit, and File Set Up. These steps are briefly described below:
View our Case Study – Point Cloud to BIM Services in more detail about the above project of Mechanical Room, Florida.
(i) Verification
Before commencing the Point Cloud to BIM modeling process, it is essential to have a clearly defined and communicated Scope of Work (SOW). The SOW outlines the trades to be included or excluded, the Level of Detail (LOD) required by the client, and other project-specific requirements.
Additionally, a clearly defined tolerance level of deviation should be established to support the successful implementation of the Scan to BIM Execution Plan (BEP/BXP).
At this stage, the coordinates and alignment of the point cloud must be verified to ensure modeling accuracy.
Several industry-standard software tools are commonly used during this verification stage to support Point Cloud to Revit workflows.
| Name | Developed by | Compatible Autodesk’s Modeling Software |
| Building Scan to BIM | Imaginit Technologies | Revit |
| Point Sense | Faro | Revit & AutoCAD |
| Edge Wise | Clearedge3D | Revit & AutoCAD Plant 3D |
| Leica Cloud Worx | Leica Geosystems | Revit |
(ii) Insertion
Then after all the verification, insertion of the point cloud scan takes place into Revit. In case if there are several Point Cloud Files it is important to assure the integrity and coordinates of all the files at once. Once the file is inserted into Revit. We must lock it down with the Pin Tool to pin it to a specific location as it earns speed when the mouse passes over the Point Cloud Scan.
(iii) File Set-Up
To start the process of File Set-Up in Revit, worksets needs to be created according to the need of the project. It is recommended to use different worksets for each Point Cloud in order to set the VVGG setting and turn on/off as required. This also reduces the opening time of the file. One should use a different workset for elements imported from the conversion tool used. To set up the levels from a Section View, ensure to lock it. The following can be the levels:
- Level 0: Level 0 should be set through the Origin Point of the Point Cloud Scan. It can/cannot be with the Project levels was it will be the reference point.
- Building Levels: It will depend on the project. The modeler must set the level line through a representative part of the floor that the Point Cloud is showing. For setting up several levels in the model at a time, we can place the Section through a stair core.
- Set Plan View: It will be set according to the created levels by the modeler.
- Girds: Girds should be set up by using the main floor of the building and set an objective of the grid system throughout the model with regular distance wherever possible.
Related reading : BIM Maturity Levels Explained- Level 0, Level 1, Level 2, Level 3
(iv) Modeling
During the modeling phase, all elements must be developed in accordance with the BIM Execution Plan (BXP). Elements should be modeled as native and accurate Revit components, avoiding the use of generic or overly complex extrusions wherever possible.
Key modeling best practices include:
- Hosting all elements to their corresponding levels
- Aligning walls, floors, and systems closely to the point cloud using plan, section, and 3D views
- Using Interior/Exterior Finish constraints when modeling perimeter walls to preserve correct wall face locations
This approach ensures that future updates to wall thickness or assemblies do not affect the established geometry of the as-built BIM model.
Gain a Deeper Perspective: Download Blog: BIM Execution Plan (BXP)- What, Why, When and How
(v) Collaboration
Effective collaboration is essential for successful Point Cloud to BIM projects. All project participants should have access to the same centralized point cloud dataset, rather than storing local copies, to avoid version conflicts and coordination issues.
To support collaboration:
- Use compatible software versions and updates
- Maintain a control model for levels, grids, and shared coordinates
- Restrict modification rights to prevent accidental changes
- Implement regular backups, as point cloud-based BIM files are typically large and data-intensive
Case Study- A Real Life Project
For Modeling, our deliverables were in .RVT and .PDF file format with Revit Version 2019, as desired by the client. We submitted different Level of Documentation like Floor Plans, Section View, Interior & Exterior Elevation 3D view for the project as per client’s Company Standards. Level of Detail (LOD) desired was 400.


Step 4 : Quality Assurance
Effective collaboration is essential for successful Point Cloud to BIM projects. All project participants should have access to the same centralized point cloud dataset, rather than storing local copies, to avoid version conflicts and coordination issues.
To support collaboration:
- Use compatible software versions and updates
- Maintain a control model for levels, grids, and shared coordinates
- Restrict modification rights to prevent accidental changes
- Implement regular backups, as point cloud-based BIM files are typically large and data-intensive
Case Study- A Real Life Project
To ensure maximum accuracy, we cross-verified LOD in the model with an appropriate graphical representation of all the elements and worksets correction. We cleaned and purge the file to remove the unnecessary data. We ran a sample test with small sets to ensure the quality of the representation. At last, we did the final audit to the deliverables are aligned with the expectation of the clients.
To ensure the quality, we have prepared a 5-pager Scan to BIM Execution Plan & Checklist + Checklist covering approximately 70-checkpoints of Level of Effort (Architectural, Structural & MEPFP elements), Model setup, Point Cloud Scan and Revit Check can come very handy and useful.
Scan to BIM Execution Plan & Checklist

Conclusion
The Scan to BIM process provides a reliable and structured approach to capturing existing building conditions and converting them into accurate as-built BIM models. By combining laser scanning, point cloud processing, and Point Cloud to BIM modeling, project teams gain a precise digital representation of real-world conditions that supports informed design, renovation, and construction decisions.
While Point Cloud to BIM represents a critical modeling stage within the workflow, the overall success of a Scan to BIM project depends on the seamless execution of all four stages- Capture, Process, Point Cloud to BIM Modeling, and Quality Assurance—in alignment with the BIM Execution Plan (BEP/BXP).
When implemented correctly, Scan to BIM enables improved coordination, reduced rework, accurate documentation, and greater confidence across renovation, retrofit, and facility management projects.
If you’re planning a project that requires accurate existing-condition documentation, explore our Scan to BIM services– we’d be happy to support your project.
The Scan to BIM process is an end-to-end workflow that uses 3D laser scanning to capture existing building conditions and convert them into an accurate as-built BIM model. It includes data capture, point cloud processing, Point Cloud to BIM modeling, and quality assurance.
No. Scan to BIM refers to the complete workflow, while Point Cloud to BIM is a key stage within that workflow where processed scan data is converted into a BIM model, typically in Revit.
Common software includes Autodesk ReCap Pro for point cloud processing, Autodesk Revit for BIM modeling, and Navisworks for coordination and clash detection.
LOD (Level of Detail) defines the amount of detail in a BIM model, while LOA (Level of Accuracy) defines how closely the model matches real-world dimensions captured during laser scanning
Scan to BIM is commonly used for renovation, retrofit, as-built documentation, clash detection, and facility management projects where accurate existing-condition data is required.
About the Author

Coordination Manager / VDC Manager at United BIM
With over 10 years of experience in the AEC industry, Akash Patel is a seasoned Coordination Manager and VDC Manager at United BIM. His expertise lies in managing complex MEP-FP coordination projects and leveraging cutting-edge BIM technology to ensure seamless collaboration and precision. Akash is dedicated to delivering high-quality, detailed models that meet the demands of modern construction. He is passionate about optimizing workflows and driving innovation within the BIM field.